I had an old skateboard deck sitting under my desk for months.
It was not in good enough condition to ride anymore. The tail was scraped, the graphic had scratches, and one side had a small chip near the edge. But every time I thought about throwing it away, I stopped. It still looked too cool to waste.
That is when I started thinking about turning it into something useful for my room.
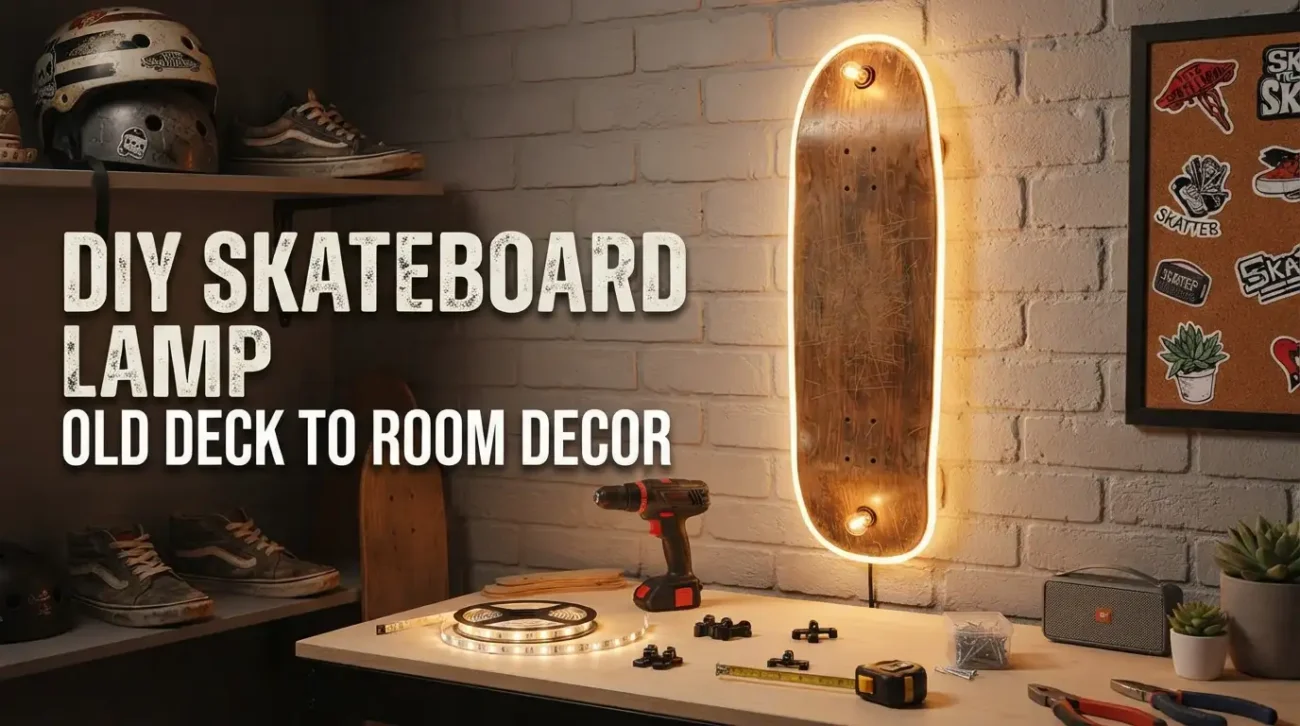
A skateboard shelf was one idea, but I wanted something that looked a little different at night. So I tried turning the old deck into a lamp. Not a complicated electrical project. Just a simple DIY skateboard lamp using LED lights, basic mounting hardware, and a little planning.
The result was honestly better than I expected. During the day, it looked like a normal deck display. At night, the soft light behind or under the board gave the room a warm skater-style glow.
If you have an old deck and want to reuse it for room decor, this is one of the coolest projects you can try.
Why a Skateboard Deck Works Well as a Lamp
Table of Contents
A skateboard deck already has a strong shape and a natural curve. That curve helps light spread nicely when LEDs are placed behind it or underneath it.
The deck also gives the lamp personality. A plain wooden lamp can look nice, but a skateboard lamp feels more personal. Scratches, worn edges, old graphics, and grip tape marks all add character.
You can make it fit different spaces too. It can work as:
- Wall decor light
- Desk lamp
- LED shelf light
- Bedside glow light
- Gaming room accent light
- Skate-themed room decoration
The best part is that you do not need to build the light from scratch. LED strip lights make this project much easier and safer than old-style wiring.
Keep It Safe First
Before getting into the steps, let’s be clear about one thing.
If you are not experienced with electrical wiring, do not try to build a wired lamp from loose wires, sockets, or exposed electrical parts. That is not worth the risk.
For most people, the safest option is using USB-powered LED strip lights or battery-powered LED puck lights. These are easy to install, easy to replace, and do not require complicated wiring.
I personally prefer USB LED strips because they are simple and clean. You can plug them into a phone charger, power bank, monitor USB port, or a small wall adapter.
Avoid cheap damaged wires, exposed cables, or lights that heat up too much. A skateboard deck is wood, so heat and unsafe wiring are not something to ignore.
Tools and Materials You Need
You do not need a huge toolbox for this project. Most of the items are simple.
Here is what you may need:
- Old skateboard deck
- LED strip lights or LED puck lights
- USB power adapter or battery pack
- Mounting clips or adhesive backing
- Small screws
- Drill
- Screwdriver
- Measuring tape
- Pencil
- Wall hooks or brackets
- Sandpaper
- Cleaning cloth
- Cable clips
- Double-sided mounting tape
- Optional remote-controlled LEDs
If you want a wall-mounted skateboard lamp, you will also need wall anchors or screws depending on your wall type.
If you want a desk-style lamp, you may need a small wooden base or stand.
Step 1: Choose the Right Skateboard Deck

Start with a deck that is still solid.
It does not have to look perfect. Actually, a used deck usually looks better for this kind of decor. But it should not be cracked through the middle or badly split.
Check the deck carefully. Look near the truck holes, nose, tail, and edges. If the wood feels soft or the layers are separating, use it only as light decor, not as something that will hold weight.
A standard skateboard deck works great. A cruiser deck can look cool too. Longboard decks are bigger, so they can create a stronger wall-light effect, but they need more space.
If trucks and wheels are still attached, remove them unless you want that complete-board look. For a cleaner lamp, I prefer using just the deck.
Step 2: Clean the Deck

Old boards usually carry dust, dirt, and grip tape mess.
Wipe the deck with a dry cloth first. For the graphic side, use a slightly damp cloth. Do not soak the deck with water. Skateboards are layered wood, and too much moisture can damage them.
If the edges are rough, sand them lightly. You do not need to make the board look new. Just remove sharp splinters and loose dirt.
If the grip tape is peeling badly, either trim the loose parts or remove it completely. Leaving old grip tape is fine if it looks decent.
Step 3: Decide the Lamp Style

Before sticking lights anywhere, decide what type of skateboard lamp you want.
There are three easy styles.
Wall Backlight Style
This is my favorite. You mount the skateboard on the wall and place LED lights behind it. The light glows around the deck and creates a floating effect.
This works well above a desk, bed, gaming setup, or shelf.
Under-Deck Glow Style
In this version, lights are placed under the deck, often along the edges. It gives the board a glowing outline.
This looks great if the deck is mounted slightly away from the wall.
Desk or Table Lamp Style
This uses the deck as part of a lamp stand or base. It takes more work, but it can look very unique.
For beginners, I recommend the wall backlight style. It is easier, cleaner, and safer.
Step 4: Test the LED Lights First

Do not attach the lights before testing them.
Plug them in and check the brightness, color, remote, and power connection. If the LED strip has color settings, test warm white, cool white, and a few colors.
Warm white usually looks best for cozy room decor. Blue or purple can look good in a gaming room. Multi-color lights can be fun, but sometimes they make the setup look too busy.
Also check if the lights heat up. Good LED strips should stay fairly cool. If they get too hot, do not use them on wood.
This small test can save you from removing everything later.
Step 5: Plan the Light Placement

Place the skateboard deck face down on a soft towel so you do not scratch the graphic.
Now lay the LED strip around the back side of the board without sticking it yet. Try a few layouts.
You can place LEDs:
- Along both long edges
- Around the full outline
- In the center area
- Behind the nose and tail
- In short sections behind the deck
For a clean glow, keep the LED strip slightly away from the outer edge. If the lights are too close to the edge, individual light dots may show too much.
If the strip has a power cable, think about where the cable will exit. It should come out from the bottom or one side where it is easier to hide.
Step 6: Attach the LED Strip

Once you like the layout, attach the strip.
Most LED strips come with adhesive backing, but I do not fully trust it on older wood or dusty surfaces. It can loosen over time. For better support, use small cable clips or extra mounting tape.
Do not bend the LED strip too sharply around the nose and tail. Some strips can handle gentle curves, but hard bends can damage them.
If your LED strip has cut marks and you need to shorten it, only cut where the strip is designed to be cut. Never cut random areas.
Take your time here. A neat LED layout looks much better when the lamp is on.
Step 7: Hide the Cable

Cable management makes a big difference.
A great skateboard lamp can look messy if the cable hangs down randomly. Use small cable clips, adhesive cable holders, or a simple cable sleeve.
If the lamp is above a desk, you can run the cable down behind the desk. If it is near a bed, run the cable along the wall corner.
For a cleaner look, choose an LED strip with a cable color that matches your wall or furniture.
If you use battery-powered lights, hide the battery pack behind the deck if possible, but make sure you can still reach it when batteries need changing.
Step 8: Mount the Skateboard on the Wall

Now decide how the board will sit on the wall.
You can use small wall brackets, deck display mounts, or simple standoff screws. The important thing is leaving a small gap between the deck and the wall if you want a backlight effect.
If the deck sits flat against the wall, the glow will not spread properly.
Use a level before drilling. I have skipped this before, and even a slightly tilted board becomes annoying once the light is on.
If mounting into drywall, use wall anchors. If you can mount into studs, that is even better. The deck is not extremely heavy, but it still needs to be secure.
Step 9: Plug It In and Check the Glow

Once the deck is mounted, plug in the LED lights and step back.
Check the glow from different angles. If one side is much brighter than the other, you may need to adjust the strip position. If the cable is too visible, add more cable clips.
Turn off the room lights and see how it looks at night. That is when the project really shows its value.
You may realize the light is too bright. If your LED strip has dimming, lower it. A skateboard lamp usually looks better as accent lighting, not as the main light source.
Step 10: Style the Area Around It

The lamp looks better when the area around it is clean.
You can place it above a desk, near a gaming monitor, over a small shelf, or beside other skate decor. Do not overcrowd the wall. Let the board be the main focus.
A few good items around it are:
- Skate shoes
- Small plant
- Helmet
- Skate tool
- Mini shelf
- Posters
- Clean desk setup
- Small speaker
If the deck graphic is colorful, keep the surrounding decor simple. If the deck is plain, colored LEDs can add more personality.
Easy DIY Skateboard Lamp Ideas
Once you understand the basic idea, you can customize it in different ways.
LED Backlit Skateboard Lamp
This is the easiest and cleanest version. Mount the deck slightly away from the wall and place LED strips behind it.
Skateboard Desk Lamp
Use the skateboard deck as a vertical stand or base. This takes more planning, but it can look great on a desk.
Skateboard Shelf Lamp
Combine a skateboard shelf with LED lights underneath. This gives you both storage and lighting.
Complete Skateboard Wall Lamp
Keep the trucks and wheels attached, then add LED lights behind the complete board. This gives a more real-skateboard look.
Color-Changing Skateboard Lamp
Use remote-controlled RGB LEDs. This is good for gaming rooms, but try not to overdo the colors.
Minimal Warm Light Deck Lamp
Use warm white LEDs only. This gives a cleaner, more grown-up look and works well in bedrooms.
Common Mistakes to Avoid
The biggest mistake is using unsafe lighting.
Do not use lights that get hot. Do not use damaged cables. Do not leave exposed wires near wood. Stick with safe LED strips or battery lights.
Another mistake is sticking LEDs directly to a dirty deck. The adhesive will fail faster. Clean the surface first.
Also, do not mount the deck flat against the wall if you want a glow effect. You need space behind it.
Do not make the cable an afterthought. Plan the power cable before installing everything.
And do not overload the design. A skateboard lamp already looks interesting. Too many colors, stickers, wires, and extra objects can make it look messy.
Is a DIY Skateboard Lamp Good for Beginners?
Yes, if you keep it simple.
The easiest version is a wall-mounted skateboard with USB LED strips. You only need basic measuring, cleaning, cable placement, and mounting skills.
If you are not comfortable drilling into walls, use a desk or shelf setup instead. You can also use removable mounting methods, but make sure they are strong enough.
For a first project, avoid complicated wiring. Use plug-and-play lights.
How Much Does It Cost?
The cost depends on what you already have.
If you already have an old deck, the main cost is the LED strip and mounting hardware. A simple setup can be fairly affordable.
A more polished setup with remote lights, better brackets, cable covers, and decorative accessories will cost more.
But compared to buying custom skate-themed lighting, making it yourself can be cheaper and more personal.
Best Places to Use a Skateboard Lamp
A DIY skateboard lamp works well in many spots:
- Bedroom wall
- Gaming room
- Desk setup
- Dorm room
- Skate room
- Garage hangout area
- Teen room
- Creative studio
- Home office corner
It works best where accent lighting makes sense. I would not use it as the only light in a room. It is more of a mood light and decor piece.
Final Thoughts
A DIY skateboard lamp is a simple way to turn an old deck into something useful and good-looking.
You do not need complicated wiring or expensive equipment. A solid skateboard deck, safe LED lights, basic mounting hardware, and clean cable management are enough to create a really nice room decor piece.
The trick is to keep it safe and clean. Use lights that stay cool, mount the deck securely, hide the cable neatly, and avoid overcrowding the design.
If you have an old skateboard deck with scratches and a story behind it, this project is worth trying. Instead of leaving the board in a corner, you can turn it into a glowing piece of wall decor that actually feels personal.